Start with the Basics
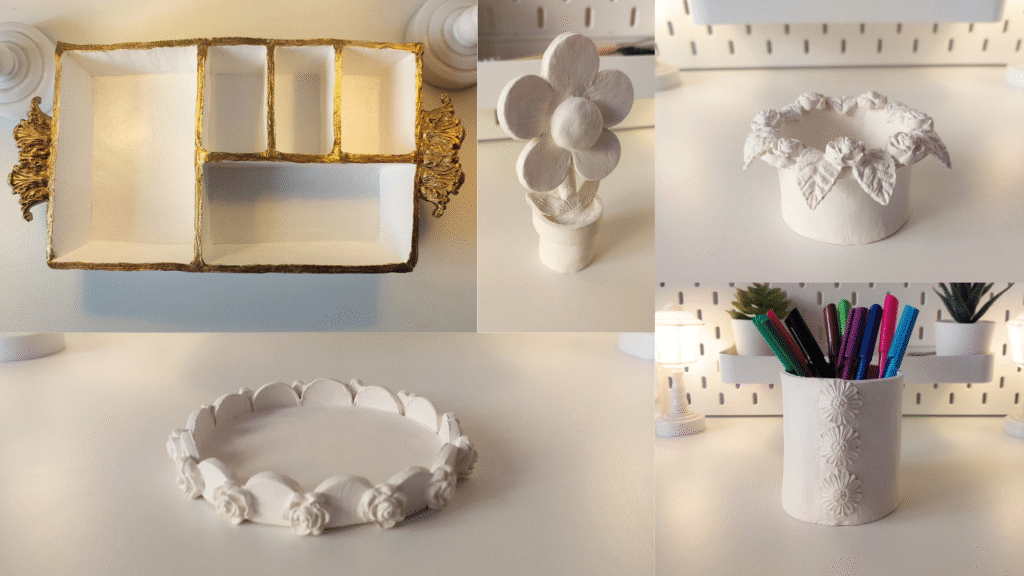
If you’ve been thinking about making clay art at home, you’re in the right place. In this article, you’ll find out exactly what clay art tools you need to get started even if you’re a complete beginner! Whether you’re interested in sculpting cute little charms or creating functional pieces like trinket trays and jewelry boxes, the tools you’ll need are simple, affordable, and in many cases already in your home.
First Must-Have: Air-Dry Clay
Which brand of air-dry clay should you choose? What’s the difference?
The one tool you absolutely need is air-dry clay. It’s beginner-friendly, doesn’t require baking, and is widely available, which makes it perfect if you’re just starting out!
However, not all air-dry clay feels the same. Some brands are firmer, like DAS and JOVI air-dry clay. Others are softer and more moist, like Crayola air-dry clay. The texture really depends on the brand.
Personally, I’ve only ever used JOVI air-dry clay (in white), and I love how firm it is. It holds its shape well and feels very controlled when working with it.
That said, firm doesn’t automatically mean better, and neither does soft.
It really comes down to your creative style:
- Firmer clay is great if you like measuring, cutting clean shapes, and building with precision, almost like engineering a small project. I would say this is my personal style.
- Softer, wetter clay is perfect for more freeform, organic sculpting. It’s ideal if you enjoy shaping directly with your hands without focusing too much on exact measurements.
And here’s the good news: texture isn’t permanent!
You can make wet clay firmer by letting it air out slightly. You can also soften firm clay with a bit of water and kneading. So if you’re just starting out, don’t stress too much about picking the “perfect” brand.
Any basic air-dry clay will absolutely do the job.
Your Work Surface Matters More Than You Think
Another thing people don’t talk about enough is the surface you work on.
After trying different options, I personally prefer working directly on my desk. It has a non-porous surface, and because my clay is on the firmer side, it doesn’t stick much at all. It feels stable, smooth, and easy to clean.
That said, I wouldn’t necessarily recommend this if you’re using softer, wetter clay. Sticky clay can cling to non-porous surfaces and make a mess. Since my clay is firmer, it works for me, but I still flip my clay occasionally to prevent any slight sticking and to keep the bottom smooth.
What I’ve seen most people use, especially beginners, is a large porous cloth. This helps prevent sticking completely and makes lifting your clay much easier. It’s a simple and affordable solution.
Another popular option is an A4 mat or a self-healing cutting mat. These are great because they protect your surface and allow you to cut shapes directly on the mat without worrying about damaging your desk. They’re especially useful if you measure and trim pieces often.
Water: Your Best Friend (and Enemy)
Once you start working with clay, you’ll quickly realize how useful water is. It helps smooth cracks, blend seams, and keep the clay workable. But use it wisely: too much water can weaken the clay and cause cracks while drying. Keep a small bowl nearby and use it sparingly with your fingers or a sponge.
You Don’t Need Fancy Clay Art Tools
There are tons of clay art tools online, but as a beginner, you don’t need to spend much. In fact, you can get great results using simple household items. Before grabbing tools, ask yourself:
- Do you want to make miniatures like charms and keychains?
- Are you more into decor like trinket trays or jewelry boxes?
- Or do you want to explore both?
Knowing your creative goals helps you choose the right tools. That way, you avoid waste, unnecessary clutter, and buying things you won’t actually use.
That said, sculpting tools are definitely helpful in the long run. They’re designed for specific purposes — like scoring clay quickly, attaching two pieces together more securely, refining small details, or smoothing surfaces evenly. While you don’t need them on day one, they do make the process faster and more precise over time.
Cutting Tools: Use What Works for You
Whether you’re slicing clay or shaping edges, you’ll need something to cut cleanly. This can be:
- A kitchen knife
- An X-Acto blade
- A ruler
- Even an old debit card
All of these work fine. Choose what feels safest and easiest for you. The goal is precision, not perfection.
Rolling Pin: Even Thickness Matters
One question I get all the time is about how I roll my clay so evenly.
There are rolling pins with adjustable rings you can attach to the sides. These rings control the thickness automatically as you roll, which makes them a great all-in-one option, especially for beginners!
However, what I personally use and love is a regular rolling pin paired with separate rolling pin guides in various thicknesses.
Why? Because it gives me more flexibility. I can switch between different guide sizes depending on the project, and I still get a perfectly even slab every time.
If you’re just starting out, you don’t need anything fancy. A wooden or acrylic rolling pin works perfectly. And if you don’t have guides yet, you can absolutely use two identical objects, like pens, paintbrushes, or popsicle sticks. Place them on either side of your clay to control thickness.
Even thickness matters more than people think. It helps prevent cracking, uneven drying, and weak spots in trays or boxes. So whatever method you choose, just make sure your slab is consistent.
Smoothing Sponge: A Finishing Essential
To smooth out surfaces and edges, a damp sponge is incredibly helpful. Choose one with fine texture (no large holes) so you don’t leave dents. If you don’t have one, even a damp microfiber cloth can help.
Carving Tools: For Detail Work
Want to add texture or carve out designs? A carving kit can help, but again, no need to buy anything right away. Toothpicks, pins, needles, and bobby pins all work for basic detailing and scoring. For miniatures, even a sewing needle or an old eyeliner brush can come in handy.
Sanding Your Clay Piece Before Painting
After your clay piece is fully dry, you can improve its surface by gently sanding it with fine-grit sandpaper. This step helps smooth out any rough edges or uneven areas before you begin painting. Use light, circular motions and avoid pressing too hard to prevent cracks. Once you’re done, brush off the dust and you’re ready to move on to painting or sealing.
Painting & Sealing Your Clay Pieces
Once your piece is fully dry and sanded, it’s time for the fun part: Painting!
Personally, I use acrylic paint for all my projects. It’s easy to work with, dries quickly, and gives a strong vibrant color. I’ve also seen some people use gouache which can work as well.
After painting, sealing is very important. Air-dry clay is naturally porous, and paint can chip over time if it isn’t protected.
There are many sealing options available. I personally love using an acrylic varnish on all my pieces. It protects the paint from chipping and adds durability. It also helps make the clay surface less porous before applying any additional finish.
If you want a glossy, glass-like look, you can use a glossy varnish. However, the shine is usually subtle. If you’re looking for a stronger, more dramatic glossy effect, I recommend resin.
I use UV resin for a thick, ultra-glossy finish.
Here’s my process:
- First, I apply acrylic varnish to seal the paint and reduce porosity.
- Once fully dry, I apply UV resin in thin layers.
- After each layer, I cure it under a UV lamp.
- I repeat until I achieve the desired thickness and shine.
Working in thin coats is key to avoiding bubbles and uneven curing.
⚠️ Important: Resin must be handled carefully. Always work in a well-ventilated area, open your windows, and wear a mask and eye protection. Resin fumes can be harmful if inhaled, and safety should always come first.
Now you know exactly what clay art tools you need to start making clay decor at home. From air-dry clay and water to household alternatives for sculpting, you don’t need a big budget, just a clear idea of what you want to create. As your skills grow, you can slowly add tools to your collection. Until then, use what you have, get creative, and have fun experimenting!